Friday, August 24, 2012

Slammin' Deal

This is just too good to not share.

In my last post I shared about Bookmans and how I can get store credit for bringing in things I find at garage sales and thrift stores to sell to them.

Well, I was in there a couple days ago, and there have been a few things on my wish list that I have been keeping my eye out for. One thing in particular I have never seen there but it's something that would be totally awesome to have.

Planet Earth: The Complete BBC Series [Blu-ray]
For those of you have not seen any of these episodes, let me tell you this is the best nature documentary that has ever been made. And we've been wanting to own it.

So as I am browsing at Bookmans I find this... 

Life & Planet Earth Collection (9pc) Blu-ray Disc 883929117406 Front

Not only is it the complete Planet Earth series, but also the complete Life series (a sequel to Planet Earth). And it was listed for $35!

So of course I bought it with the Bookmans credit that I have saved up. And since I tend to get anywhere from 2x to 4x the profit on what I bring in to sell to them, I'm guessing that my out-of-pocket cost is only $10-$15 for this treasure. And if you click on the picture you will see that at Best Buy it's being sold for $99.99!
Total savings? $85!

Now that's a slammin' deal!

Friday, August 17, 2012

Bookmans Fun

Here in Mesa, AZ, there is a store called Bookmans. It's a really fun entertainment exchange store. Obviously, the thing they have the most of is books, but they also have DVD's, CD's video games, and even musical instruments. And they buy things from people that want to bring in their movies, books, etc. They will offer store credit or cash, but usually the store credit is twice as much or more as the cash they offer.

I found out about Bookmans right after we moved down here. And started taking some things that we didn't want anymore over there and got some store credit for it. Then as I would shop at thrift stores I would see things that I knew Bookmans would give me store credit for at a profit. So over the last year or so when find things to take to bookmans, I'll buy them and get some store credit to use for presents or other things.

Here's my latest exciting deal!

While I was at Barnes & Noble the other day, they had a $2 bin and I found a brand new Glee Cranium in it.

Glee Cranium

Now, I don't watch Glee, but I knew I could get more than $2 credit for it at Bookmans. So I bought it. And Bookmans gave me $5 in store credit for it. Not as much as I had hoped, but still not bad.

Then while I was at Bookmans, I found Harry Potter and the Deathly Hallows Part 1 on Blue Ray for $5.

Harry Potter and the Deathly Hallows, Part 1 [Blu-ray]

We already own 1-6 on Blue Ray and we've been looking for this one and Part 2. This was a great deal for Bookmans, normally they would be selling this movie for $12-$15 dollars. So when I saw that it was only $5, I wasn't going to pass that up and I bought it!

So, when all was said and done, I paid $2 for a Blue Ray, practically brand new, HP and the Deathly Hallows Part 1. That's a great deal!

Monday, July 23, 2012

Grocery Bag Holder

When I grocery shop I usually use my cloth shopping bags. I like them because they can hold more, they are sturdy, and I don't have to have a ton of the plastic grocery bags around my house.

On the other hand I occasionally forget to take my cloth bags or don't have them on me when I need to stop and pick something up from the grocery store on my way home from something. And having a few of those bags around the house is helpful for trash bags and other such things. But they tend to get unorganized quickly under my kitchen sink.

So I came up with a nice, compact solution.


A plastic Folders coffee container, which I turned upside down and cut a square and 4 slits in. 


Just stuff the bags in through the lid (I can stuff quite a few bags into this thing), seal, and turn upside down. It fits great under my sink!

Tuesday, July 17, 2012

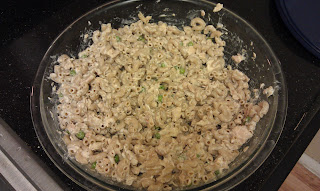
Cold Pasta Dinner #1

For those that don't know, Phoenix gets really hot in the summer. And cooking dinner can be a challenge for a few reasons. First because using too much of the oven or stove really heats up our little apartment. Second, because most of the time is so hot that we don't really want to eat anything that's too heavy or hot.

So one of my solutions to that problem is to make a few different cold pastas for dinner. Here is the first one which I got from my lovely step-mother.

Tuna Noodle Pasta

Ingredients
3 cans tuna
1 box noodles ( I like whole wheat)
1 or 1 and 1/2 cup frozen peas
Mayonnaise or Miracle Whip (I use the Miracle Whip)


First boil your noodles. Right before they are done cooking put your frozen peas into the pot.
Then drain your noodles and mix in the tuna and Miracle Whip to taste.
Done!


We like to eat it with a little Chalula on top!


This is a great recipe that makes a bunch of pasta that you can save for snacks or meals later in the week! Enjoy!


Thursday, July 12, 2012

Save Money, Clean Naturally

Allow me to introduce you to two of my good friends.

That’s right, ladies and gentleman (drum roll please…..)


Baking Soda and Vinegar.

Yes, it’s true. These two simple and frugal household staples have hundreds of uses.  Which means you can use them instead of purchasing dozens of household products.  Which means you can save money. Which, in my case, makes me very happy.


Here are just a few things you can do with Baking Soda.
  • Treat insect bites and burns - make a paste out of baking soda and water and apply to the affected area. The paid should lessen or disappear immediately. This also works great for canker/cold sores.
  • Make your own toothpaste - combine baking soda and hydrogen peroxide or use this recipe.
  • Use it to wash your hair that’s right, it’s the "no-poo" (er, no shampoo, that is) method. Follow it up with an apple cider vinegar rinse. No, this isn’t just for hippies – it works great! Read more about no-poo here.
  • Clean kitchen/bathroom surfaces sprinkle baking soda on the surface and spray on some white vinegar. The fizzy chemical reaction will lift grime and dirt. Let it do its thing for a few minutes, then simply wipe away with a sponge or rag and voila! This works great to clean your bathtub, sink, and even the burned crusties on the bottom of the oven. I used this on my glass stove top and it removed those nasty rings of cooked-on food.
  • Clean greasy pots and pans let your pans soak in your sink with baking soda, dish detergent and water. Then, sprinkle some more baking soda on your sponge for a scratchless scouring powder.
  • Remove marks from furniture or walls I haven’t tried this yet, but it looks promising. Sprinkle some soda on a damp sponge and rub lightly. Finish by wiping with a clean damp cloth.
  • Use it to boost your laundry detergent – add ½ cup soda to your washing machine to get your clothes extra clean and smelling fresh. I always do this when I wash a load of stinky towels.
  • Clean your garbage disposal - deodorize and unclog your garbage disposal by pouring in 1/2 cup baking soda and 1/2 cup vinegar. Let it fizz for 5 minutes then run hot water down the disposal.
  •  Deoderize the carpet - sprinkle baking soda on the carpet and let it sit as long as possible or overnight. Sweep up the larger amounts of baking soda and vacuum up the rest.
  • Make your own deodorant – that’s right! Coconut oil, baking soda and cornstarch. I’ve used this recipe.
And those are just some of baking soda’s many talents. Let’s move on to vinegar, shall we?

  • Use as an all-purpose cleaner – mix 2 parts water with 1 part vinegar in a spray bottle and use this to clean all your kitchen and bathroom surfaces. And I mean, all of them. Works beautifully to clean sinks, toilets, tile, bathtubs, kitchen counters, stovetops, mirrors, glass, chrome….need I go on? It even prevents mold and mildew. So go ahead and get rid of all those various cleaners stashed under the sink (good-bye, bleach!).
  • “Unstick” stickers, decals, and price tags - simply saturate the corners and sides of the sticker with full-strength white vinegar and carefully scrape it off (an old credit card works well). Apply more vinegar to remaining sticky residue and let it sit for 5 minutes before wiping off. Works well to remove labels from glass jars, wine bottles, etc. for all those repurposing projects we’ve all seen on Pinterest.
  • Get rid of grease stains - wipe with a cloth dampened in a solution of equal parts white vinegar and water.
  • Condition your hair – an apple cider rinse works wonders on your hair and leaves it soft and silky. Mix 1 tablespoon apple cider vinegar with a cup of warm water and pour it on your hair after shampooing (or, go no-poo if you’re feeling brave). Give your hair a good final rinse and you’ll be treated with soft, detangled hair. It also helps to eliminate dandruff! And in case the hubby is concerned, the vinegar smell will completely disappear once your hair dries.
  • Makes cleaning your microwave easy – fill a glass bowl with ¼ cup vinegar mixed with 1 cup water and microwave for 5 minutes on high. After it cools a bit, dip a rag or sponge into the mixture and wipe away food grunge.
  • Disinfect those cutting boards – wipe them down with vinegar after use. The vinegar with disinfect and kill food-bourne ickies and keep your cutting boards good as new.
  • Keep hard water stains off your glasses – add about 1/4 cup vinegar to your dishwasher’s rinse cycle. This works!
  • Clean stains and build-up in your coffee maker – mix 2 cups vinegar with 1 cup water and run it through your coffee maker (in the water chamber). Then, run clean water through the coffee maker for 2 cycles.
  • Keep those eggs from cracking – add 2 tablespoons vinegar to the pan when hard boiling eggs to keep them from cracking and make them easier to shell.
  • Boost your laundry – pour 1 cup vinegar in your washing machine’s rinse cycle and let the magic begin. The vinegar will help brighten clothes, eliminate static, soften fabrics. And, it will even clean your washing machine. BAM!
  • Treat a sore throat – gargle with vinegar and water. I’ve tried this, and it works.
  • Get rid of ants – pour or spray vinegar on ant infested areas or ant piles. Ants can’t stand the smell of vinegar. Much less stinky and toxic than ant spray!


There are literally hundreds of uses for vinegar. And since I know you don’t want to spend all day reading this, I’ve chosen to mention just a few that have worked for me.

You can purchase a 4lb box of baking soda for less than $3 and a gallon of distilled white vinegar for about $5.

Score!

On top of the savings, it’s good to know you’re using natural, safe products in your home (and not the toxic stuff that can almost certainly knock out a small animal). Hooray!

Monday, July 9, 2012

Homemade Baby Food

Ever look at the selection of baby food for your 8 month old?  You know - those cute little jars of orange and green mush that you find in the baby isle of your grocery store.  While I appreciate the convenience of ready-to-serve food for my youngster, I'm often disappointed in the variety of food they get to eat, not to mention the high prices.  If your kid is like my son, he LOVES to eat, so why not give him some new flavors besides carrot, squash and green bean and save yourself some cash at the same time?

Homemade baby food is your answer!  It's not hard to make, but does take a little time.  I can't take credit though.  I love the bestselling book Super Baby Food by Ruth Yaron.  She tells you what your baby can eat at what age, how to buy and prepare the food and best of all, how to store it - in an ice cube tray!  "The Cube Method" is fantastic.  Most foods can be bought fresh, steamed in the microwave, pureed in the blender and then scooped into the ice cube tray.  Freeze it overnight, then transfer it to a ziplock freezer bag.  The frozen cubes will keep on average for about 2 months.  When its time for him to eat, pop a couple cubes (or for my son, about 10 cubes!) into the microwave and defrost for a couple minutes - then walla - homemade baby food!

This has saved our family a fair amount of money.  Each little jar will run about $0.50-.80 per 3 oz. jar.  But today I picked up broccoli for $0.88/pound. So I spent about $1.50 and will make about 20 ounces of baby food.  I would have spent more like $4.50 if I had bought the jars.  

Even more than the cost-saving though, I love the different food my baby eats.  He's 10 months old and has already tried spinach, brussels sprouts, sweet potato, avacado, squash, cauliflower, black beans, green beans, peaches, plums, bananas, applesauce...all through the food cube method.   I also have high hopes that my kids will like more foods as they grow older due to trying them at a young age.  All in all, homemade baby food has plenty of benefits for frugal wives (and mothers)!


Cheaper Starbucks

There aren't many people that don't like Starbucks. Coffee and a great atmosphere can't easily be passed up. And let's face it, it's everywhere. In a five mile radius from where I live, there are at least 10 Starbucks according to Google Maps. And in fact there is one about 200 yards from my apartment. So, it becomes a great place to read my Bible and hang out with my friends.

But there is a down side to Starbucks (and to almost every coffee shop). It's expensive and we just can't afford a large coffee budget.

There are a few ways around this.

1. Get the house brew. A great option and probably my husbands favorite. Plus if you are a Starbucks Gold member (which we are) you get free refills. This option is also available in an iced version which is nice for the blazing summers here in Phoenix. I surely don't want a hot beverage when it's 108 degrees outside.

2. Get an Americano (espresso and water). One of the cheapest espresso drinks and also available iced.

But what if I want something a little more substantial? Like an iced mocha, which is my favorite. Well, a Grande Iced Mocha at Starbucks is about $4.35 + tax. Those can start to add up fairly quickly with how much I go to coffee shops through out the month.

So, I figured out a way to make my favorite drink cheaper. I just bring my own milk.

Before I head over to Starbuck, I fill a canteen with some milk from home (which I already get on sale at the grocery store for $1.57/gallon most weeks). Then I order 2 shots of espresso, on ice, with 2 pumps mocha in a Venti cup.

And then I add my milk.


Voila! A Venti Iced Mocha.

How much does it cost me??

$2.78

I think that's one awesome deal! Obviously, this only works for iced espresso beverages. 
But I am totally happy with that.


Monday, July 2, 2012

Grocery Savings

There are lots of ways to save money on your monthly grocery bill. Some people do coupons (even to the extreme). I tried doing that for a while. I did most of my shopping at Fry's Food, which is the local Kroger brand grocery store. At the time they were accepting competitor coupons which made some things really cheap because I could use multiple coupons on one item. It got a little crazy cutting so many coupons and trying to keep them all straight. And when Fry's stopped accepting competitor coupons, I decided I didn't want to put the time into coupons that was needed in order to get a big savings.

So, I have a new method now, which takes only about 20 minutes a week and saves me quite a bit of money. My co-frugal wife, Denise Meyer, and I go grocery shopping together on Mondays and we make two stops.

The first stop is at American Discount Foods. It's a local, Christian owned, store that sells that stuff that other grocery stores don't want anymore. Some of it is slightly damaged or about to expire. Some of it is already expired foods, but they are usually either canned foods or frozen foods that won't really go bad until the end of time. I don't buy everything there, but I see what they have and try to buy for the future. Like if they have a great deal on frozen brats, I'll buy them knowing I can plan them into next weeks meal line up. Denise and I like shopping there a lot and we enjoy supporting that store.

Our second stop is Walmart. Why Walmart? Because they ad match. So, I spend about 20 minutes looking through the weeks ads from the local grocery stores and write down the things that I want to buy. They I simply take that list with me to Walmart, and when I get to the register I just tell the cashier what I have ad matches for. If they want to confirm that price they have to have the ad and check it themselves. I love it! I get all the different deals from every grocery store at one place!

On average I spend about $40 a week on groceries for 2.5 people (we have a roommate that sometimes eats at home). It's no extreme couponing, but it works!

Friday, June 29, 2012

Reupholstered Ottoman

Hi all, my name is Beth (but some call me Kat) Randall and I am a frugal wife. I also blog here but I am all about the bargains and diys! My latest undertaking was reupholstering an ottoman. For about two years we had this ottoman tucked into a vanity-turned footboard.

We have it partially for looks, mainly so Lilu, our corgi, could get on the Bed. Unfortunately it was made of vinyl, so after 2 years of corgi bounces it was ripping pretty badly. It was on the top of my hubs list for me to reupholster for awhile. Eventually the ottoman's day came when I was invited to a craft night, composed of other frugal wives, so I packed up my sewing machine and officially began.

Step 1.) I started by ripping out the staples on the bottom of the ottoman

Step 2.) I cut off the old vinyl in a strip around the base (so it was a long rectangle.) The top circle part basically fell off in chunks.

Step 3.) Then I saw this underneath, not what I was expecting. Thus I knew a future step would involve buying new foam. I put the white batting that you see here around the base to make sure the straw wouldn't poke through. I also changed my approach to more of a slipcover technique since the bottom was the only thing that could be stapled, there was no wood in the frame. This link was very helpful.


Step 4.) I used the strip of old fabric as a pattern and cut the new fabric to match, adding a little extra for seams. My fabric wasn't long enough so I had to seam two pieces together, (But I did my best at matching up the plaid stripes! See the vertical seam below)

Step 5.) Next, I re-sewed the piping into the new orange plaid. I basically cut a long skinny piece of fabric and wrapped it around the vinyl covered piping and using a zipper foot on the sewing machine (which will allow you to sew snugly right next to the tube of piping) sewed it up

Step 6.) Then I sewed one side of the seam allowance hanging off the piping onto the rectangle of fabric.


So now the sides are done, it basically becomes a tube of fabric with piping on the top. The tricky part is the circle...

Step 7.) Measure from the middle of the ottoman (there was a hole where the old button was) to the edge, then take that measurement and cut string to match. I pinned one end in the center of my square of foam ($7.50 with my jo-ann's coupon) tie the other end to my sharpie and drew a circle.


Step 8.) Cut out the foam into a circle, (make sure it fits the top of the ottoman nicely) and use that circle to trace another circle on the top fabric piece. Then cut out the circle out of the fabric with about .75" to 1" extra.


So this is the part that took me a few minutes to think though, I kept thinking I was over-simplifiing, I was so scared to sew a circle but all it ended up being was

Step 9.) I matched up the line that was drawn on the fabric with the seam line that was sewn when I stitched the fabric to the piping (the side that is showing the picture, farthest from the fabric is the side I sewed onto the circle of fabric). Making sure right (patterned) sides of the fabric are together. I sewed very slowly making sure the lines matched up and stitch by stitch we made it around the circle.

Step 10.) Once the base was sewn onto the top, the only thing left to sew was one side. I decided to do that one by hand in order to ensure a tight fit.


No my stitches aren't discreet, I used the thickest thread I had to protect my ottoman from numerous corgi leaps, plus you don't see half the ottoman when it is nestled in place.

Step 11.) we used the same thread to pull the same orange button through, using a hanger, it took a lot of nick's muscle but the straw gave way and it came through, tufting the top!


Step 12.) Last step was just to pull tight and staple the fabric to the bottom, (I misjudged how much added height I would need with the new foam so I ended up sewing extra fabric on bottom so that we would have plenty to staple.)


And it's done! I was glad to keep the pop of orange and the plaid adds another layer of texture to our space.


Lilu was happy to have it back, the 3 days it was out of commission she was a little diva about whining to get up on the bed.


That's it! I found the fabric at Tempe Sales, I think it was $1 a yard and I got 2 yards. the foam and batting were around $15, and it took about 6 hours, two 3 hour stints :) Nick was a happy camper.

Until Next time!

Wednesday, June 27, 2012

Cooler Catcher

An end to drink cooler puddles! I found this great idea on Pinterest. I had an old 2 Liter soda bottle and used an exacto knife to get the cutting started. Scissors have better precision after the initial cut. And viola! 


Wednesday, June 20, 2012

Monkey Knot

I have been in my house for over a year now and my living room walls are still bare. I want to decorate with a nautical theme. Grandpa Geraghty would be proud. I found a sailor's knot called the monkey knot on pinterest  http://www.designsponge.com/2012/03/diy-best-of-rope-projects.html . Below is how I made mine.

Start with 13 ft of 1/2 inch manila or unmanila rope.
Fill a ziploc bag up with stones or use an old tennis ball for the center weight.
Wrap the stone bag with tape to shape it into a ball.
Wrap the rope 4 times around your hand, about the size of your  stone bag.
Turn the coils to the side and wrap another 4 times in the opposite direction.
Finally, turn coils again and weaving under & over, make a final  side of 4 coils.
Tighten the knot starting at the beginning coils and working the rope around.
This step requires quite a bit of work. We had to do it several times over
before getting the knot snug. 
Finished monkey knot!
Paired with an antiqued lantern
My mantle- beginning stages...

Monday, June 4, 2012

Homemade Kindle Cover


I bought Eddie a Kindle Touch for Christmas last December. I wanted him to have a cover for it, but I didn't really have the extra $20 or $30 to spend on one nor did I think he would like one of the fancy covers. Plus I knew that one thing Eddie didn't like about Kindles is that you don't have the feel of holding a book. So I decided to make him a cover out of a book. Unfortunately I didn't take pictures from start to finish. But I have some of the finalized product. I think it turned out awesome!
 
I started with this little book that I got at a second hand store for about $1. I pre-measured it to make sure it would be the right size for his Kindle. Then I used a knife to take out the pages of the book leaving just the outer cover.
 I cut two slits in the back for an elastic strap, pulled the strap through the back cover and glued them to the inside.


I cut and sewed a piece of fabric to the size of the back and binding and then sewed elastic straps to the fabric. After the elastic straps were sewn on, I then glued the whole piece onto the inside of the back cover. For the inside of the front cover I glued a piece of felt to help keep the screen from getting scratched.


And there it is! Now Eddie can have the feel of holding a book and it offers plenty of protection for the Kindle.